Quickstart Guide
Learn how to integrate SuperTokens with AWS Lambda
The following guide shows you how to use SuperTokens in an AWS Lambda environment. You can also check out the example repository for a full implementation.
Before you start
These instructions assume that you have completed the quickstart guide. If not, please go through it and create the example application before you start this tutorial.
Steps
1. Set up API Gateway
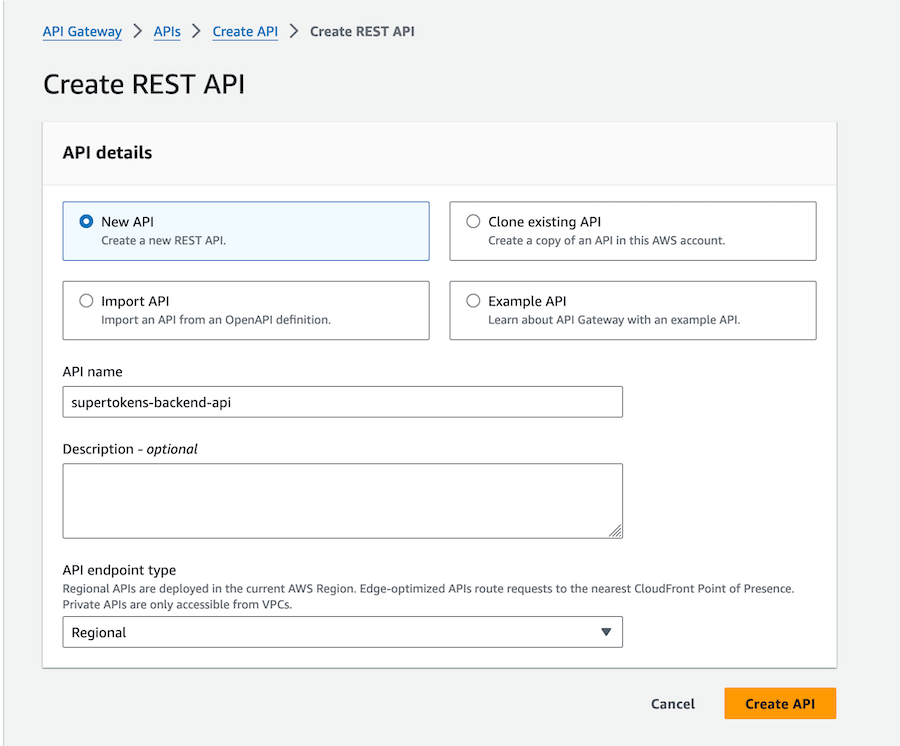
1.1 Create a REST API Gateway
We will be using AWS API Gateway to create a REST API that will be used to communicate with our Lambda functions.
1.2 Set up authentication routes
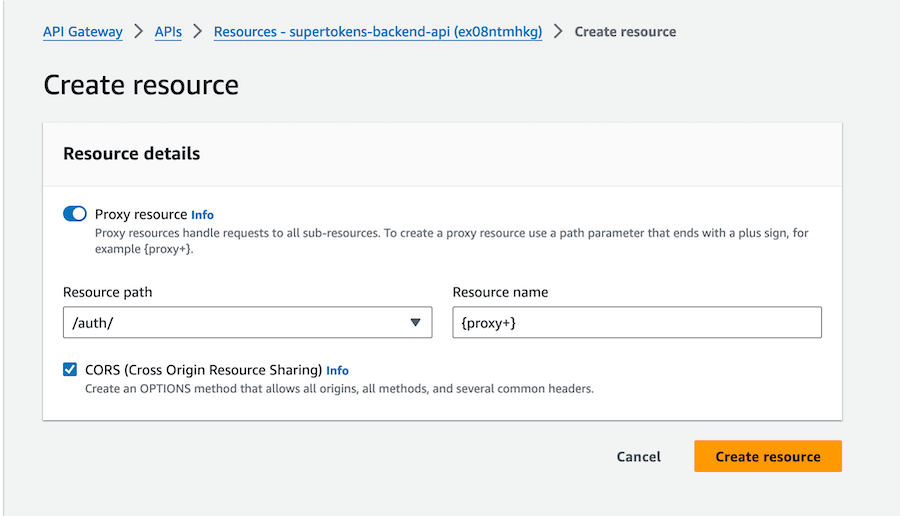
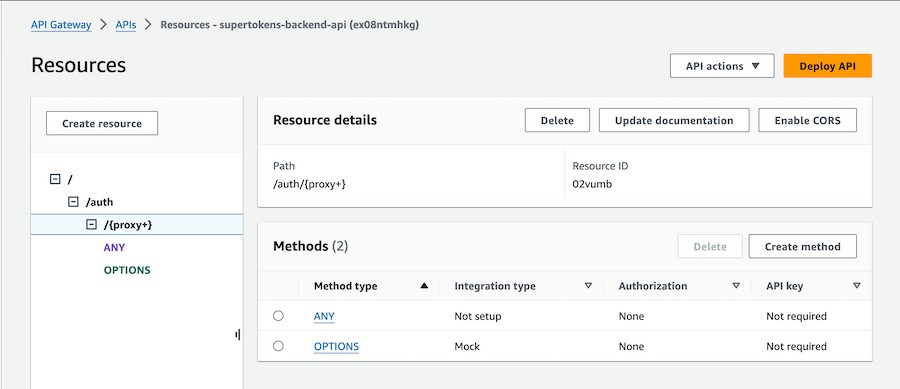
Create an /auth resource and then an /auth/{proxy+} resource.
This will act as a catch-all for all SuperTokens auth routes.
1.3 Attach a Lambda function to the ANY method of the proxy resource
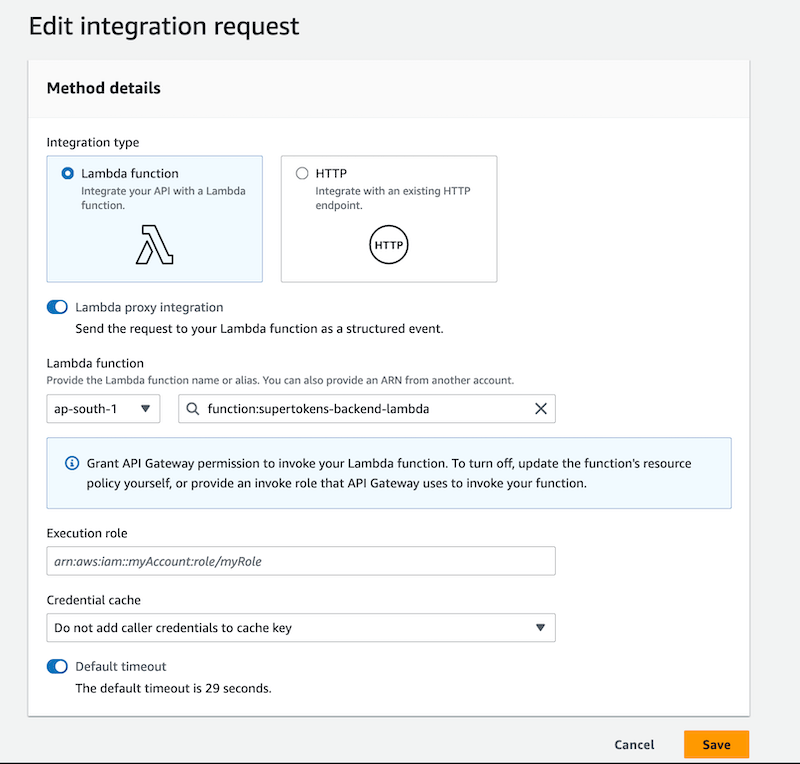
Click on the “ANY” method and then “Integration” to configure the Lambda function. Check Lambda proxy integration and then select your lambda function.
1.4 Configure CORS for the proxy path
Click on the {proxy+} resource and then “Enable CORS” button to open the CORS configuration page.
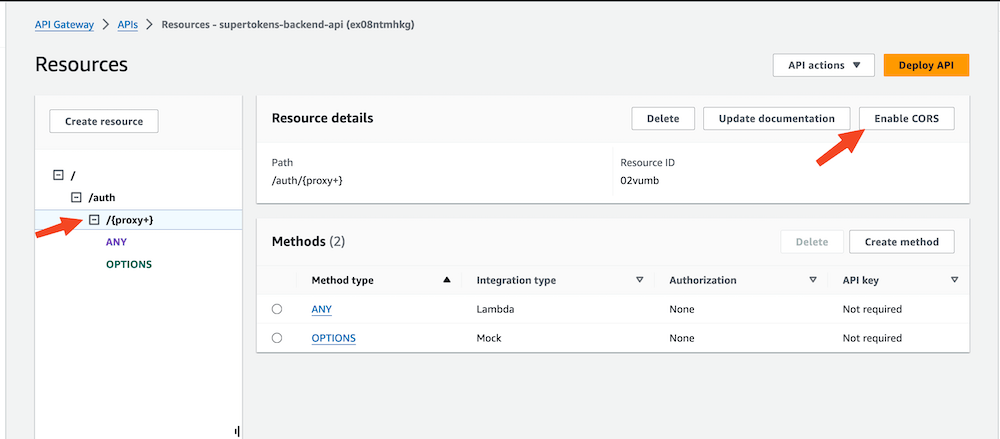
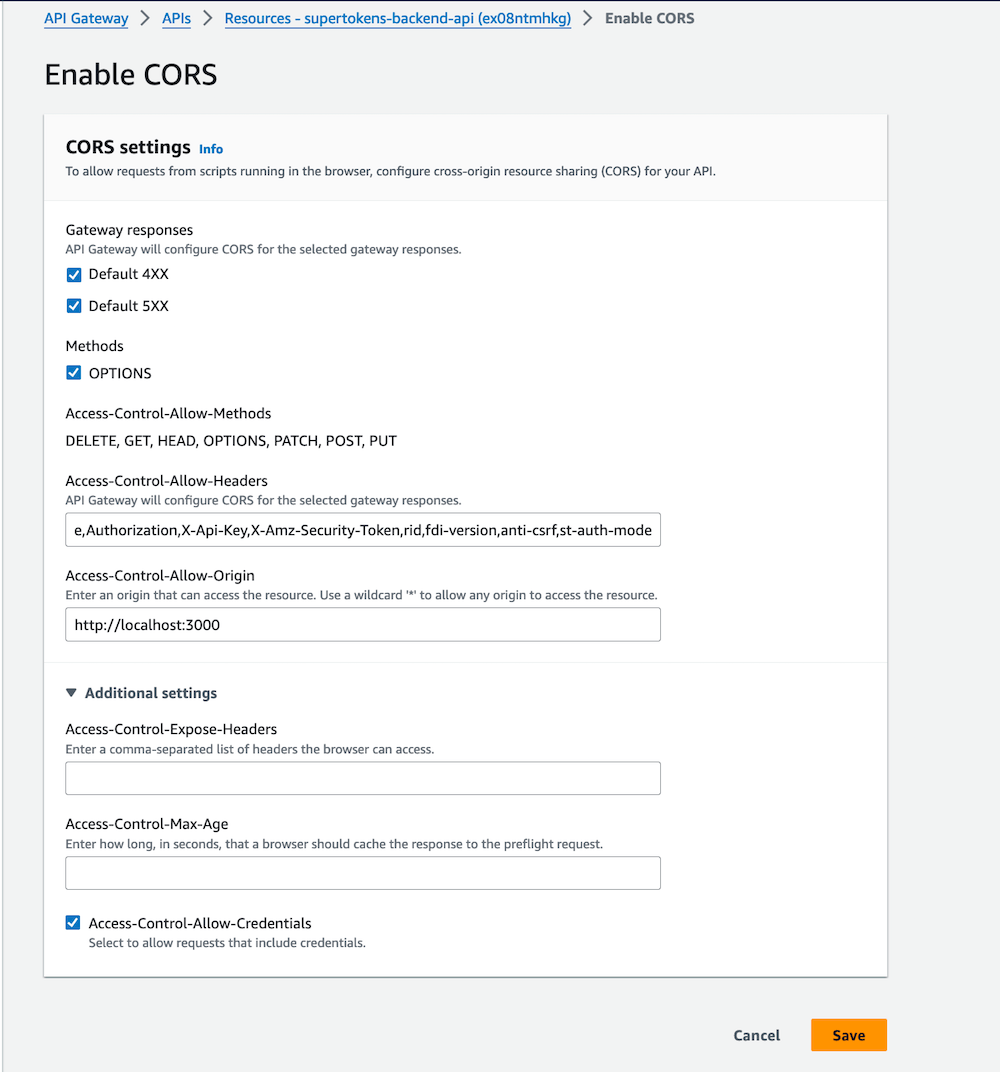
Configure an OPTIONS response for /auth/{proxy+} with:
Access-Control-Allow-Origin: <YOUR_WEBSITE_DOMAIN>, using the exact trusted website origin.Access-Control-Allow-Credentials: true.Access-Control-Allow-HeaderscontainingContent-Typeand every value returned by the backend SDK’sgetAllCORSHeaders/get_all_cors_headersfunction.Access-Control-Allow-Methodscontaining every method your API accepts, includingOPTIONS.
Do not use * for Access-Control-Allow-Origin with credentialed browser requests. Because this is a Lambda proxy
integration, the Lambda response must also include the CORS headers on actual requests. Configure gateway-generated
errors separately if your browser client must read their responses.
1.5 Deploy the API Gateway
Deploy the API to a stage named dev and record its invoke URL. AWS changes console labels periodically; verify the
resource, integration, OPTIONS, and gateway-response configuration in the deployed stage rather than relying only on
the screenshots in this guide.
2. Set up Lambda layer
2.1 Create Lambda layer with required libraries
Build the layer in the AWS SAM build image for the function’s exact runtime and architecture. The commands below target
Lambda x86_64 (linux/amd64). For a Lambda arm64 function, change PLATFORM to linux/arm64. Do not build native
dependencies on an unrelated workstation OS or architecture.
For Node.js, create package.json with exact direct dependency versions. Generate and review package-lock.json once,
commit it with the Lambda source, and build only with npm ci. The lock file pins the complete transitive graph;
package.json alone is not a deployment lock.
For Python, create requirements.in with exact direct dependency versions. Compile and commit a hash-locked
requirements.lock, then install with --require-hashes. Do not deploy directly from requirements.in.
{
  "private": true,
  "type": "module",
  "dependencies": {
    "@middy/core": "7.9.2",
    "@middy/http-cors": "7.9.2",
    "supertokens-node": "24.0.3"
  }
}PLATFORM=linux/amd64
BUILD_IMAGE=public.ecr.aws/sam/build-nodejs24.x:1.165.0
# Run this only when intentionally updating the committed lock file.
docker run --rm --platform "$PLATFORM" \
--volume "$PWD:/var/task" --workdir /var/task \
"$BUILD_IMAGE" npm install --package-lock-only --ignore-scripts
# Reproducible layer build from the reviewed lock file.
rm -rf node_modules nodejs supertokens-node.zip
docker run --rm --platform "$PLATFORM" \
--volume "$PWD:/var/task" --workdir /var/task \
"$BUILD_IMAGE" npm ci --omit=dev
mkdir nodejs
cp -R node_modules nodejs/
zip -r supertokens-node.zip nodejs/fastapi==0.141.1
mangum==0.22.0
nest-asyncio==1.6.0
supertokens-python==0.31.3PLATFORM=linux/amd64
BUILD_IMAGE=public.ecr.aws/sam/build-python3.14:1.165.0
# Run this only when intentionally updating the committed lock file.
docker run --rm --platform "$PLATFORM" \
--volume "$PWD:/var/task" --workdir /var/task \
"$BUILD_IMAGE" sh -c \
'python -m pip install "pip-tools==7.6.1" && pip-compile --generate-hashes --output-file requirements.lock requirements.in'
# Reproducible layer build from exact versions and package hashes.
rm -rf python supertokens-python.zip
docker run --rm --platform "$PLATFORM" \
--volume "$PWD:/var/task" --workdir /var/task \
"$BUILD_IMAGE" python -m pip install \
--require-hashes --only-binary=:all: --target python --requirement requirements.lock
zip -r supertokens-python.zip python/For Node.js, pin the SAM image by digest in CI after verifying that the digest matches the selected platform. The version tag above prevents implicit SAM CLI upgrades, while the digest prevents registry-tag movement.
For Python, pin the SAM image by platform-specific digest in CI. Hash locking protects downloaded Python distributions; the image digest protects the build tools and Amazon Linux environment.
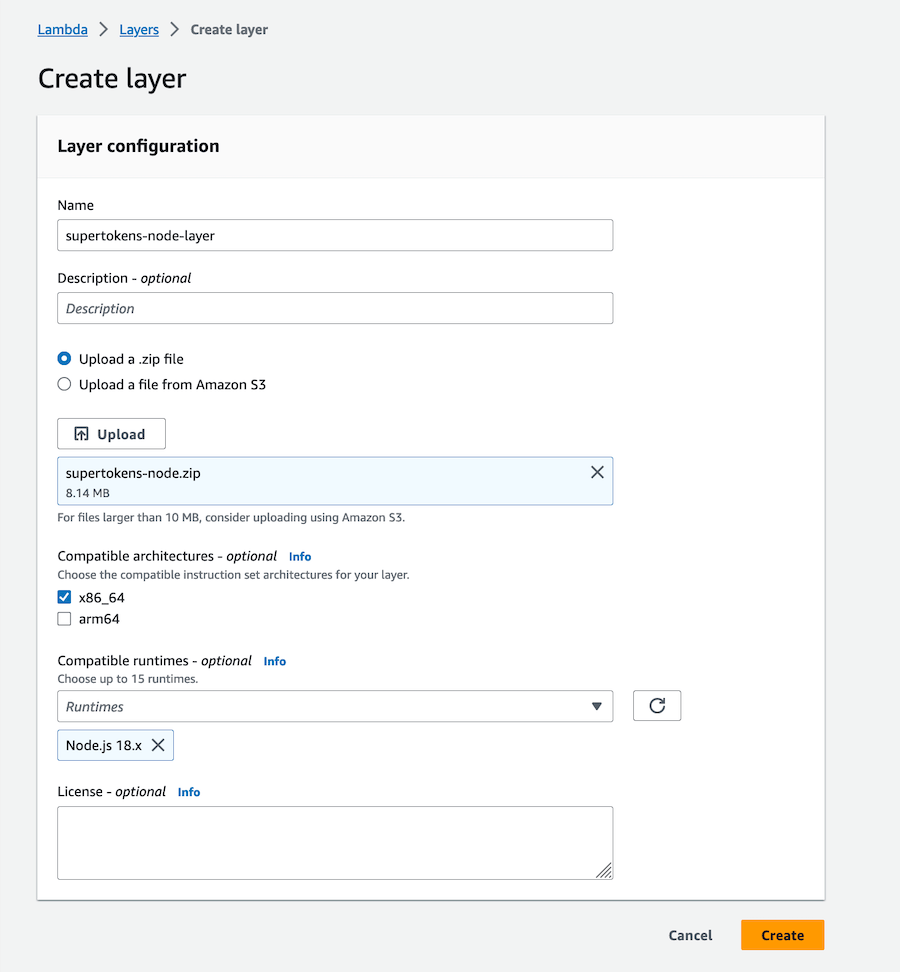
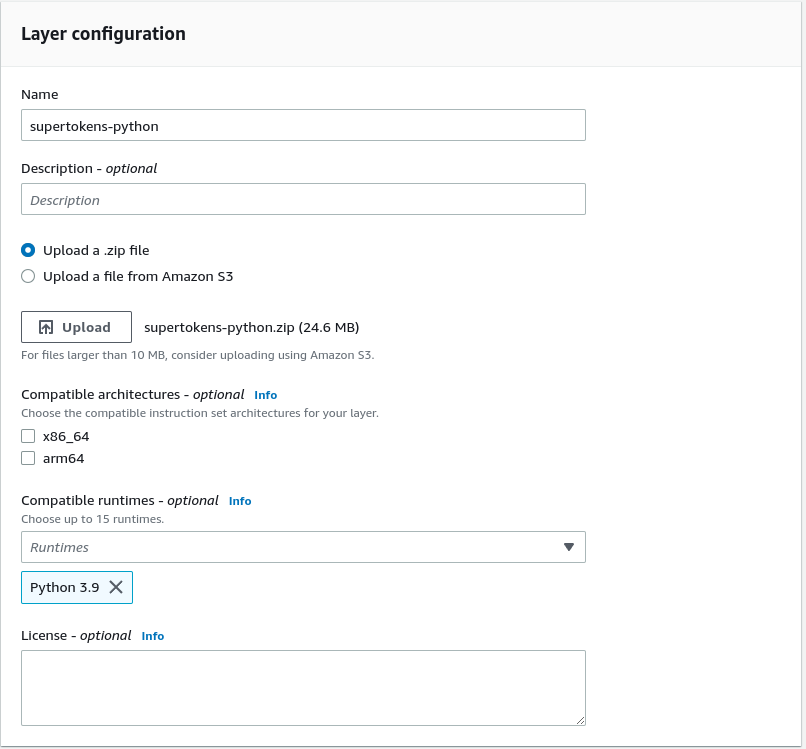
2.2 Upload the SuperTokens Lambda layer
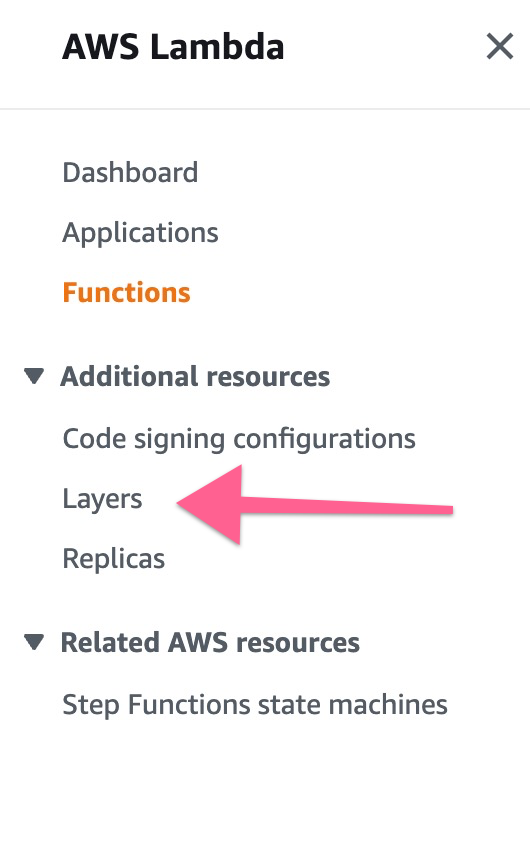
Open AWS Lambda dashboard and click on layers:
Click “Create Layer” button:
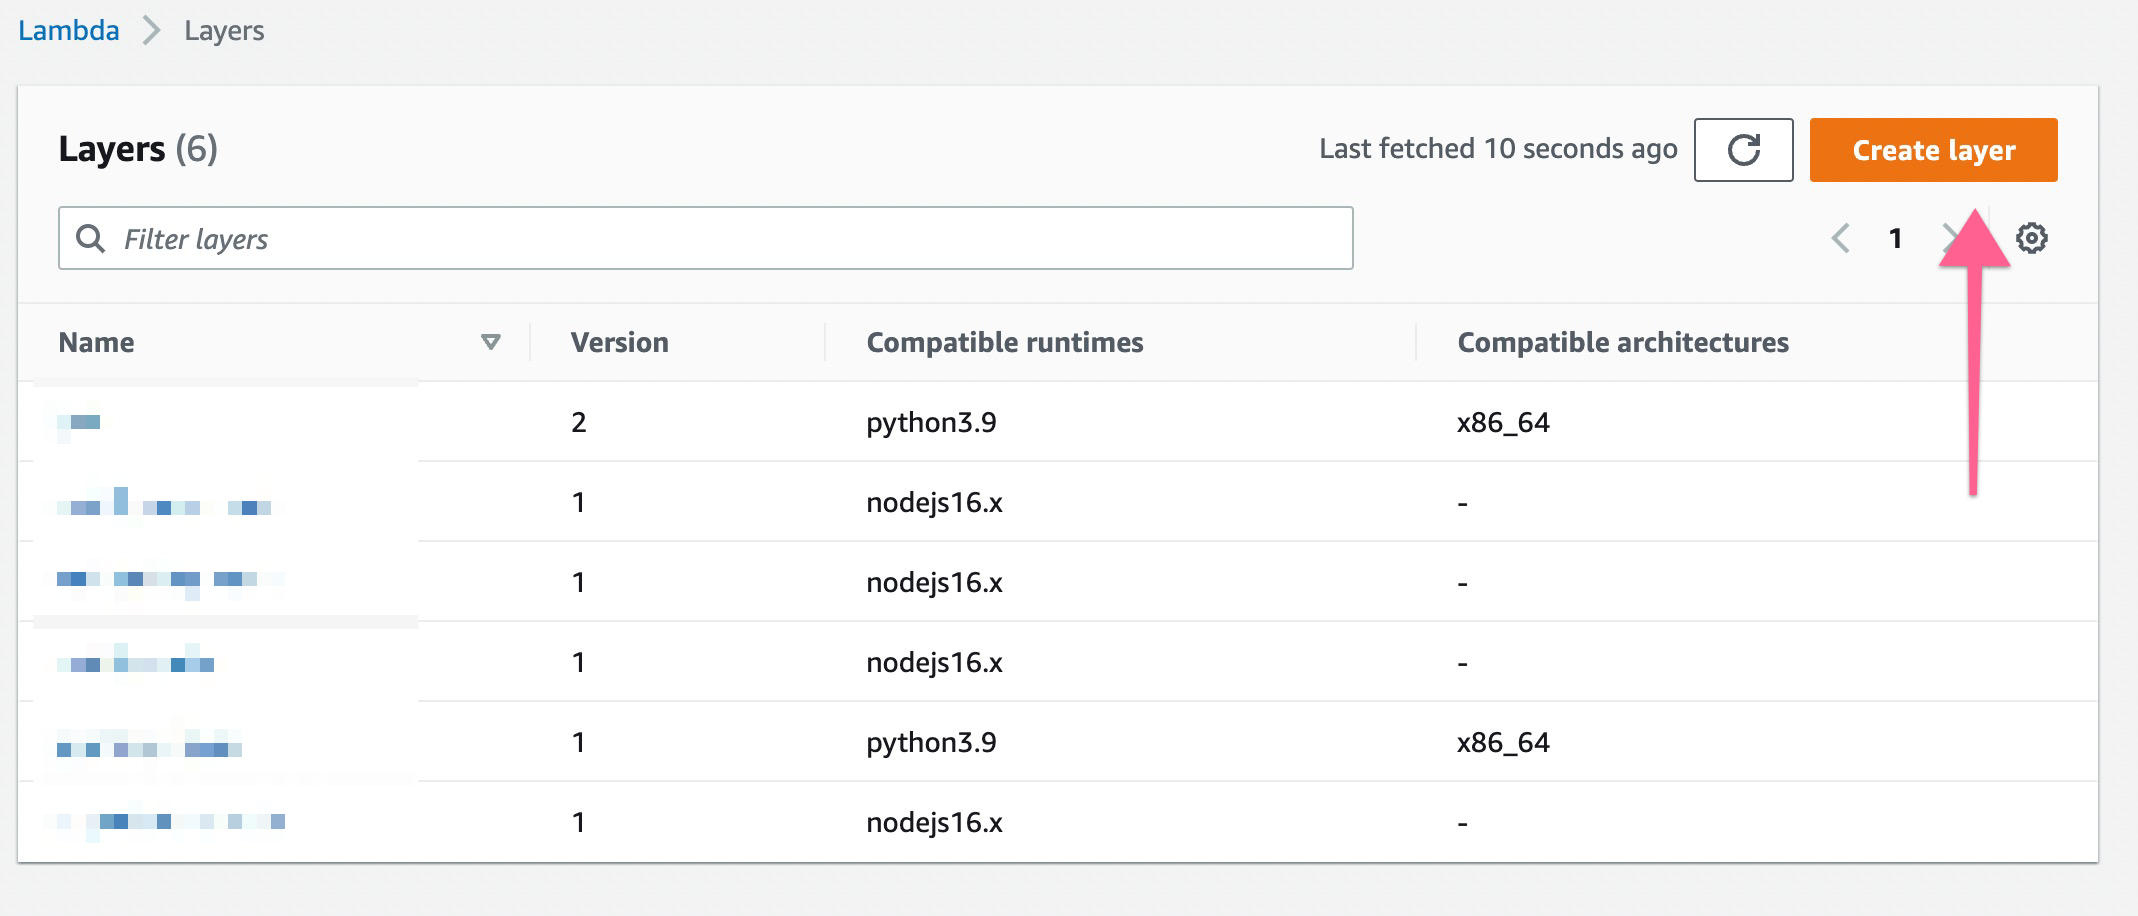
Name the layer, upload the ZIP file, and select the same runtime family and architecture used for the container build.
These examples target the Amazon Linux 2023 Node.js 24 (nodejs24.x) and Python 3.14 (python3.14) runtime versions.
Test dependency lock updates before promotion. Monitor the Lambda runtime support schedule
and upgrade before deprecation.
3. Set up the Lambda function
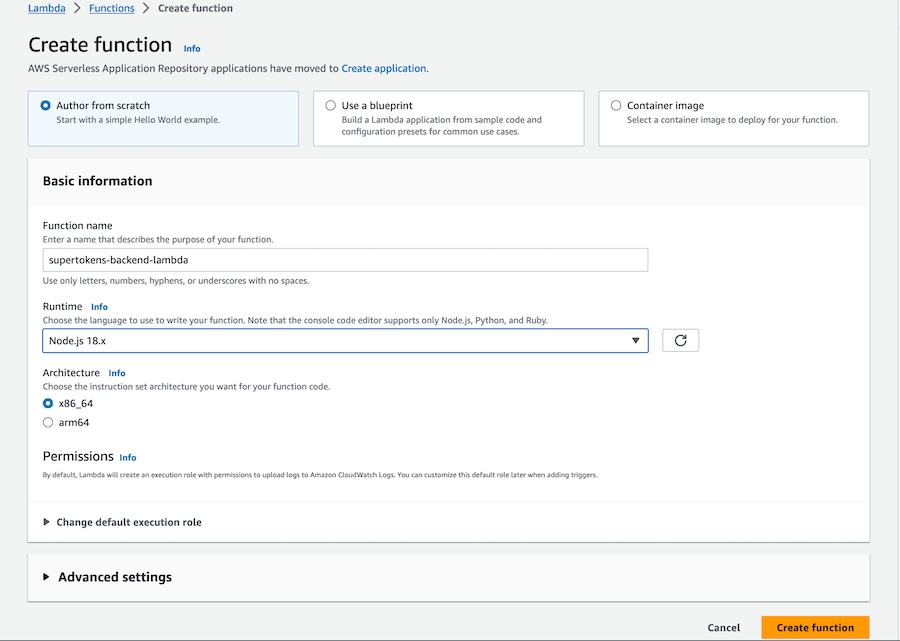
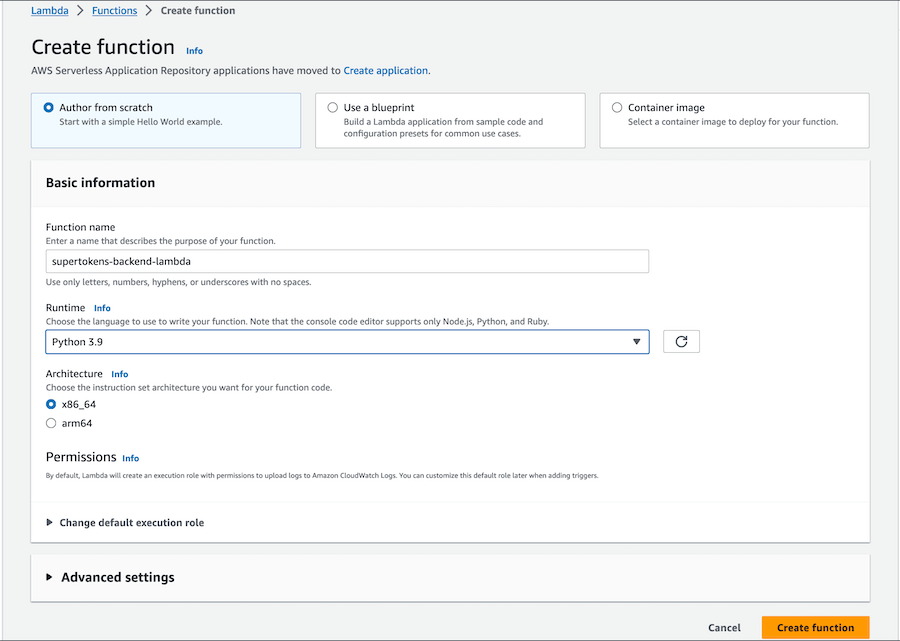
3.1 Create a new Lambda function
Click “Create Function” in the AWS Lambda dashboard, enter the function name and runtime, and create your Lambda function.
3.2 Link the Lambda layer with the Lambda function
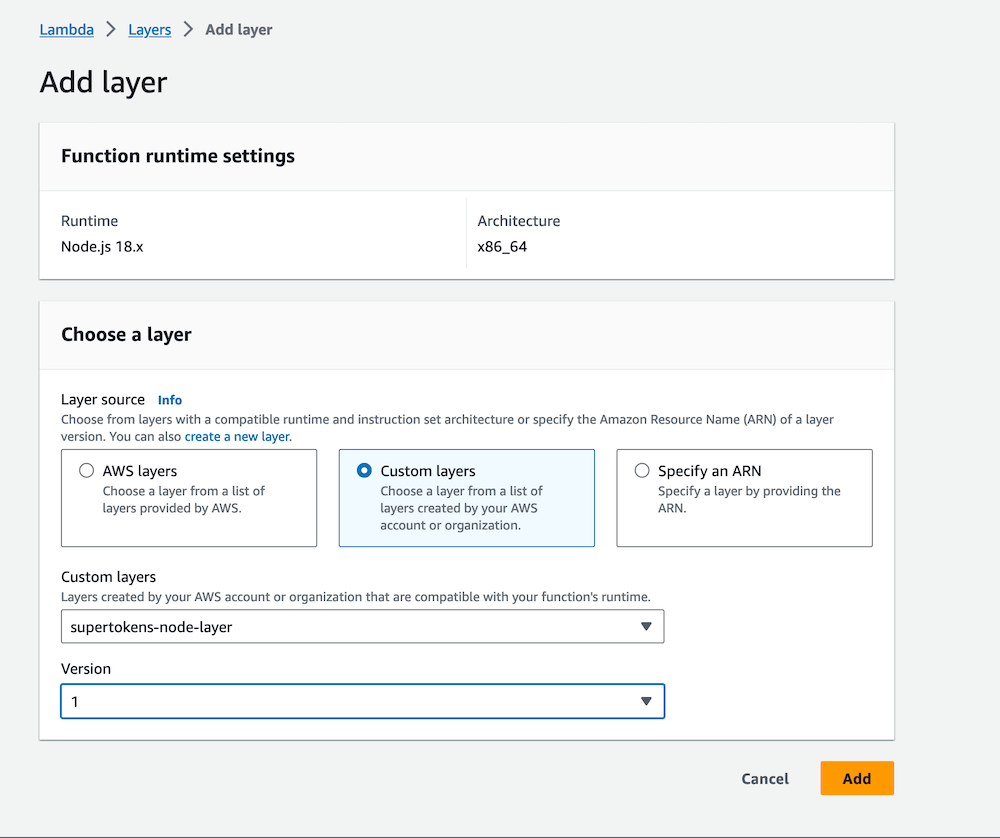
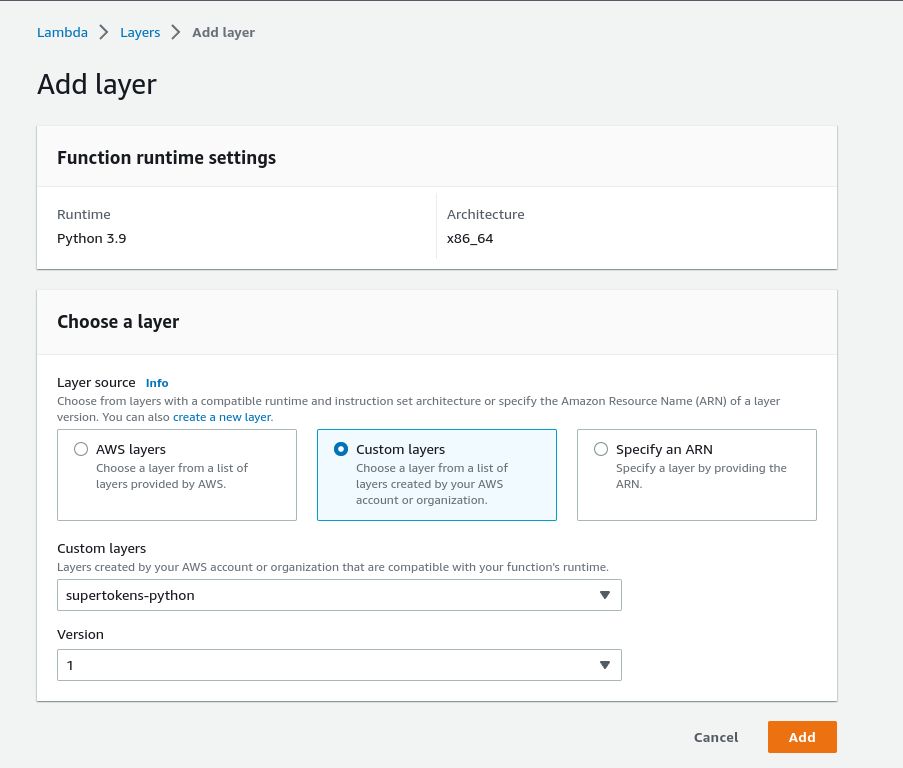
Scroll to the bottom and look for the Layers tab. Click on Add a layer

Select Custom Layer and then select the layer created in step 2:
3.3 Create a backend config file
Using the editor provided by AWS, create a new config file and write the following code:
import EmailPassword from "supertokens-node/recipe/emailpassword";
import Session from "supertokens-node/recipe/session";

export function getBackendConfig() {
  return {
    framework: "awsLambda",
    supertokens: {
      connectionURI: "<CORE_API_ENDPOINT>",
    },
    appInfo: {
      // learn more about this on https://supertokens.com/docs/references/backend-sdks/reference#sdk-configuration
      appName: "<YOUR_APP_NAME>",
      apiDomain: "<YOUR_API_DOMAIN>",
      websiteDomain: "<YOUR_WEBSITE_DOMAIN>",
      apiBasePath: "/auth",
      websiteBasePath: "/auth",
      apiGatewayPath: "/dev",
    },
    recipeList: [EmailPassword.init(), Session.init()],
    isInServerlessEnv: true,
  };
}
from supertokens_python.recipe import emailpassword, session
from supertokens_python import SupertokensConfig, InputAppInfo
supertokens_config = SupertokensConfig(
connection_uri="<CORE_API_ENDPOINT>",
)
app_info = InputAppInfo(
# learn more about this on https://supertokens.com/docs/references/backend-sdks/reference#sdk-configuration
app_name="<YOUR_APP_NAME>",
api_domain="<YOUR_API_DOMAIN>",
website_domain="<YOUR_WEBSITE_DOMAIN>",
api_base_path="/auth",
website_base_path="/auth",
api_gateway_path="/dev",
)
framework = "fastapi"
recipe_list = [
session.init(),
emailpassword.init(),
]3.4 Add the SuperTokens auth middleware
Using the editor provided by AWS, create/replace the handler file contents with the following code:
import supertokens from "supertokens-node";
import { middleware } from "supertokens-node/framework/awsLambda";
import { getBackendConfig } from "./config.mjs";
import middy from "@middy/core";
import cors from "@middy/http-cors";

supertokens.init(getBackendConfig());

export const handler = middy(
  middleware((event) => {
    // SuperTokens middleware didn't handle the route, return your custom response
    return {
      body: JSON.stringify({
        msg: "Hello!",
      }),
      statusCode: 200,
    };
  }),
)
  .use(
    cors({
      origin: getBackendConfig().appInfo.websiteDomain,
      credentials: true,
      headers: ["Content-Type", ...supertokens.getAllCORSHeaders()].join(", "),
      methods: "OPTIONS,POST,GET,PUT,DELETE",
    }),
  )
  .onError((request) => {
    throw request.error;
  });
import nest_asyncio
nest_asyncio.apply()
from fastapi import FastAPI
from starlette.middleware.cors import CORSMiddleware
from mangum import Mangum
from supertokens_python import init, get_all_cors_headers
from supertokens_python.framework.fastapi import get_middleware
import config
init(
supertokens_config=config.supertokens_config,
app_info=config.app_info,
framework=config.framework,
recipe_list=config.recipe_list,
mode="asgi",
)
app = FastAPI(title="SuperTokens Example")
app.add_middleware(get_middleware())
app = CORSMiddleware(
app=app,
allow_origins=[
config.app_info.website_domain
],
allow_credentials=True,
allow_methods=["GET", "PUT", "POST", "DELETE", "OPTIONS", "PATCH"],
allow_headers=["Content-Type"] + get_all_cors_headers(),
)
handler = Mangum(app)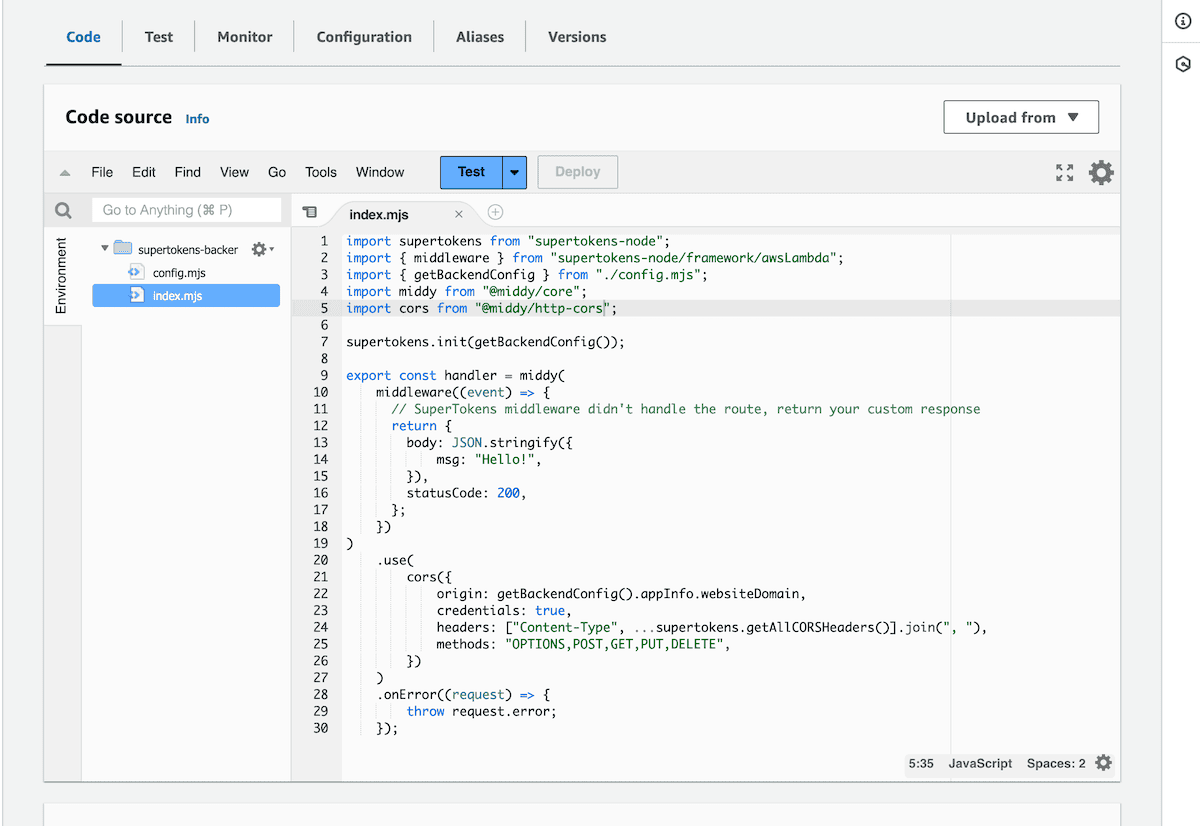
The .mjs files use native ECMAScript modules. Supported Node.js Lambda runtimes load them without the deprecated
--experimental-specifier-resolution=node option. Keep explicit file extensions on relative imports.
3.5 Filter additional plugins or extensions (optional)
If you are using AWS Lambda plugins, extensions, or anything that adds events to the lambda function (e.g. serverless-plugin-warmup), then you may need to prevent calling SuperTokens with them.
These kinds of events lack request details that SuperTokens expects and might lead to unintended errors.
Here’s an example of how you can filter them out:
import supertokens from "supertokens-node";
import { middleware } from "supertokens-node/framework/awsLambda";
import { getBackendConfig } from "./config.mjs";
import middy from "@middy/core";
import cors from "@middy/http-cors";

supertokens.init(getBackendConfig());

const httpHandler = middy(
  middleware((event) => {
    // SuperTokens middleware didn't handle the route, return your custom response
    return {
      body: JSON.stringify({
        msg: "Hello!",
      }),
      statusCode: 200,
    };
  }),
)
  .use(
    cors({
      origin: getBackendConfig().appInfo.websiteDomain,
      credentials: true,
      headers: ["Content-Type", ...supertokens.getAllCORSHeaders()].join(", "),
      methods: "OPTIONS,POST,GET,PUT,DELETE",
    }),
  )
  .onError((request) => {
    throw request.error;
  });

const postAuth = async (event, context) => {
  // Plugins generally inject a `source` property in the event object.
  if (event.source === "serverless-plugin-warmup") {
    console.info("postAuth 010: warming up lambda. Bypassing authMiddleware.");
    return {
      statusCode: 200,
      body: JSON.stringify({ message: "Warm-up successful" }),
    };
  }

  return httpHandler(event, context);
};

export const handler = postAuth;